

နည္းပညာဗဟုသုတ ျပည့္၀ၾကပါေစ

Showing posts with label Hardware. Show all posts

Friday, March 21, 2014

Device Manager အကြောင်း

Device Manager ဆိုတဲ့ အတိုင်း Device များကို ထိန်းသိမ်း ပြုပြင်ရာမှာအကောင်းဆုံး Tool ပါ။ အမှန်တကယ်သာ အသုံးချ တက်မယ်ဆိုရင် Device & Driveဆိုင်ရာပြသာနာ များကိုလွယ်ကူချောမော စွာဖြေရှင်းနိုင်ပါလိမ့်မယ်။ ကွန်ပျူတာအသုံးပြုနေကြသူတိုင်း ``Device Error Messages´´ များကို တစ်နည်းမဟုတ်တစ်နည်းတော့ တွေ့မြင်ဘူးကြမှာပါ ဒီလို Error Messages လေးတွေပေါ်မှာ အခြေခံပြီးတော့Device ဆိုင်ရာ ပြဿနာများကို ဖြေရှင်း ထိန်းသိမ်း နည်းကိုဆွေးနွေးသွားပါမယ် ..

ပထမဆုံး အဆင့်ကတော့ Hardware တွေကို ထိန်းသိမ်းပြုပြင်ပေးမဲ့ နေရာလေးကို သွားကြရအောင်။ window key နဲ့ F1 ကို တွဲနှိပ်လိုက်ပါ Help and Support Center ကျလာပါမယ်။ Fixing a problem ကိုက်ညီမဲ့ ဟာကို ရွေးချယ်ပြီး သူရဲ့ အစီအစဉ်လမ်းညွန်လေးတွေ အတိုင်း လုပ်ဆောင် သွားယုံပါပဲ။ ``Help and Support Center´´ ရဲ့ အားသာချက်ကတော့ E book များလို ရှင်းပြရုံသာမကလိုအပ်တဲ့ tools တွေဆီကို တိုက်ရိုက် link လုပ်ပေးထားလို့ အတော်လေးကို လွယ်ကူအဆင်ပြေပါတယ်။ Device တွေမှာ ပြဿနာတစ်ခုခု ရှိနေပြီဆိုရင် ကာလာတစ်မျိုးမျိုးနဲ့ ပြလေ့ရှိပါတယ်။ လက်တွေ့စမ်းသပ်ကြည့်ရအောင်။ Device တွေရဲ့ ပင်မထိန်းချုပ်တဲ့ နေရာဖြစ်တဲ့ Device Manager ကို Run Box မှာ devmgmt.msc လို့ရိုက်ထည့်ပြီး ခေါ်ယူလိုက်ပါ။ အဝါရောင် Exclamationpoint လေးနဲ့ ပြသနေတာကတော့ Device မှာ ပြဿနာတစ်ခုခုရှိနေတယ်။ အငြင်းပွားစရာလေးတွေရှိနေတယ် ဆိုတဲ့ သဘောပါ ...

အနီရောင် “X” နဲ့ပြသနေရင်တော့ သေချာပါတယ် Device ကို Disable လုပ်ထားလို့ပါ အပြာရောင် “ i “ လေးနဲ့ ပြနေတာကတော့ Device ရဲ့အစိတ်အပိုင်း ဖွဲ့စည်းပုံများကို Change (or) Modifyလုပ်ထားတဲ့ Information ပါ ဒီအပြာရောင် “i” လေးကတော့ တစ်ခုကို နှစ်ခုရွေးကြည့်နေတဲ့ အခြေအနေမျိုးမှာ ပဲပေါ်ပါတယ် တစ်ခုကို နှစ်ခုကိုကြည့်တယ်ဆိုတာက View Menu လေးကို အသုံးပြုပြီးတော့ “Resource by type” or” Resoure by connection” ဆိုပြီး ကြည့်ရှုခြင်းမျိုးကို ဆိုလိုပါတယ်။ အတွေ့ရအများဆုံး ကာလာဖြစ်တဲ့ အဝါရောင် “ ? “လေးနဲ့ Problem ပြနေရင်တော့ Device ကို double-click လိုက်ပါ Error mesaage နဲ့ ပြဿနာဖြစ်နေတဲ့ အခြေအနေကို ပြောပြနေပါလိမ့်မယ်။ Generaltab\Troubleshoot ကို click လိုက်ပါ။ ကူညီပါရစေ( Help and support center)ကိုရောက်လာပါမယ်။ “ I’m having a problem with my …. ….” ဆိုတဲ့စာကြောင်းကို Checkပေးပြီး ရှာဖွေလိုက်ပါ။ လူတိုင်း အလွယ်တကူ နားလည်နိုင်တဲ့ Instructions လေးတွေ ပေးပါလိမ့်မယ်။ Instructions များအတိုင်း Step by Step ပုံမှန်လုပ်ဆောင်သွားမယ်ဆိုရင် အဆင်ပြေသွားပါပြီမေးခွန်းထဲမှာ အဖြေရှိဆိုသလို Error Message များ ရဲ့ Information ကိုလိုက်ပြီး ဘယ်လို ပြုပြင်ထိန်းသိမ်းမှုတွေ ပြုလုပ်နိုင်မလဲဆိုတာပါ ဖြစ်ပေါ်တတ်တဲ့ error codes, messages တွေနဲ့ ဖြေရှင်းနည်းတွေကို ကြည့်လိုက်ပါ....

1. “ This device is not configured correctly “ဒီ မက်ဆေ့ကို တွေ့ရပြီး ဆိုရင်တော့ Drivers ကို Hard Update wizard ကိုအသုံးပြုပြီး Update သာ လုပ်လိုက်ပါ(properties\drive\Update driver)

ဒါကနည်းလမ်း (၁) ပါ နည်းလမ်း(၂)ကတော့

Device ကို Remove လုပ်ပြီး ပြန် run ကြည့်ပါ။

2. “The device loader(s) for this device could not load the device driver “

အမှတ်စဉ် (၁) message အတိုင်း ပါပဲ remove လုပ် ပြီးရင် install ပြန်လုပ်၊ ဒါမှအဆင်မပြေရင် Update လုပ်ပါ။

3.”The driver for this device might be corrupt or your system may be running low on memory or other resources” My computer ကို right click လုပ် properties မှာ ဘာပြဿနာလဲဆိုတာ မြင်ရပါပြီ။ RAM နည်းနေလို့ပါ။ RAM ပိုမိုစိုက်လိုက်ခြင်းဖြင့် ဖြေရှင်းနိုင်ပါပြီ။ RAM မစိုက်ချင်သေးဘူးဆိုရင်တော့ အပေါ်ကအချက်တွေလိုပဲ Update\Remove\Add ဒါမှမဟုတ် Troubleshotting wizard နဲ့ကြိုးစားကြည့် နိုင်ပါသေးတယ်။

4.”This device is not working properly because one of its drivers may be bad, or your Registry may be bad” ဒီလို error မျိုးကို Update (or) Remove\Add နဲ့ဖြေရှင်းနိုင်ပါတယ်။

5.”the driver for this device requested a resource that windows does not know how to handle” error မျိုးကိုတော့ Update\Remove\Add နဲ့ဖြေရှင်းနိုင်ပါတယ်။

6. ”Another device is using the resources this device needs” Properties ကို Click လိုက်ပါ။

7.”The drivers for this device need to be reinstalled” ဒါကတော့ ရှင်းပါတယ် Reinstall လုပ်လိုက်ပါ။

8. ”Code 8 has many error messages associated with it” Update \ Remove\Add

9.”Code 9 has several error messages associated with it”Remove\Add လုပ်ဖို့ ကြိုးစားကြည့်ပါ။ အဲဒါတွေ အလုပ်မလုပ်နိုင်တော့ဘူးဆိုရင် Registry setting မှာသွားပြင်ရပါမယ်။ သင့်ရဲ့ BIOS ကိုလဲ Update လုပ်ဖို့လိုအပ်နေပါပြီ။

10.”The device either is not present ,is not working properly,or doesn't have all the drivers installed.This code may also have manufacturer-specific error message associated with it,depending on the device.” Computer ကို သေချာချိတ်ဆက်ထားခြင်းမရှိလို့ပါ။ physically ပိုင်းကို သေချာပြန်လည် ချိတ်ဆက်လိုက်ပါ။

11.”This device cannot find enough free resources that it can use .” ဒီနေရာမှာ type ဆိုတာက resourse type ကိုပြောတာပါ။ (ဥပမာ- IRQ, DMA, Memory, or I/O) ဒီပြဿနာကိုတော့ Troubleshoot ကို click ပြီး troubleshooting wizard ကို Run ခြင်းအားဖြင့်ဖြေရှင်းပါ။

12.”This device either ie not present,is not working properly or does not have all the drivers installed.” Detect hardware ကို click ပါ။ အဆင်မပြေသေးဘူးဆိုရင် Remove\Add လုပ်ဖြင်အားဖြင့်ကြိုးစားနိုင်ပါသေးတယ်။

13.”This device cannot work properly until you restart your computer” ဒီလို error ပေးလျှင် ကွန်ပျူတာကို Restart ချလိုက်ပါ။

14.” This device is causing a resource conflict.” Troubleshoot ကို click ပြီး troubleshooting wizard ကို Run လိုက်ပါ။

15.” Windows cannot identify all the resources this device uses.” Resourse tab ကို click ပါ။ Settings အောက် က detailed လေးတွေကို ကြည့်ပြီး ဖြေရှင်းပါ။

16. “The driver information file is telling this child device to use aresource that the parent device does not have or recognize.” ဒီနေရာမှာ name ဆိုတာကတော့ device ရဲ့ .inf file ကိုဆိုလိုတာဖြစ်ပါတယ်။ Update drivers\Remove\Add တို့နဲ့ ဖြေရှင်းနိုင်ပါတယ်။

17.” Reinstall the drivers for this device.” reinstall driver ကိုနှိပ်ပါ။

18.”Your Registry may be bad” Click check Registry

19.”windows could not load one of the drivers for this device” Click update drivers

20.”Windows is removing this device” အချိန်တော်တော်ကြာအောင် စောင့်လိုက်ပါဦး။ ပြီးရင် Device manager ကို refresh လုပ်လိုက်ပါ။ Device လေးပေါ်လာပြီဆိုရင်တော့ computer ကို Restart လုပ်လိုက်ပါ။

21.”The device is disabled” Click Enable Device

22.”The device is disabled” Click Start Device

23.”Several error messages may appear with Code 23.” Properties\update driver လုပ်လိုက်ပါ။ ပေါ်လာတဲ့ buttonအပေါ်မှာမူတည်ပြီး လုပ်ဆောင်မှု့အဆင့် ကွဲပြားနိုင်ပါတယ်။


24.” This device is not present, is not working properly, or does not have all its drivers installed.” Detect hardware ကို click ပါ။ ပေါ်လာတဲ့ button အခြေအနေပေါ်မှာ မူတည်ပြီး လုပ်ဆောင်သွားရမှာပါ။

25.” Windows is in the process of setting up this device.” ကွန်ပျူတာကို Restart ပေးလိုက်ပါ။

26.” Windows can't specify the resources for this device.”Device Manager ကို အသုံးပြုပြီး Remove လုပ်လိုက်ပါ။ control panel မှ Add new Hard wizard နဲ့ ပြန် run လိုက်ပါ။ ဒီအဆင့်လုပ်ဆောင် ပြီးတဲ့ အချိန်ထိ ကောင်းကောင်း အလုပ်မလုပ်သေးဘူးဆိုရင် Update လုပ်လိုက်ပါ။

27.” The drivers for this device are not installed.” Reinstall drivers ကို click ပါ။

28.” This device is disabled because the firmware for the device did not give it the required resources.” BIOS မှာ စစ်ဆေးကြည့်လိုက်ပါ။ နောက်တစ်နည်းကတော့ CMOS seetings မှာ သွားပြီး Device ကို Enable ပေးလိုက်ပါ။

29.” This device is using an Interrupt Request (IRQ) resource that isin use by another device and cannot be shared. You must change theconflicting setting or remove the real-mode driver causing the conflict.”Device Manager ကို ဖွင့်လိုက်ပါ။ IRQ တစ်ခုထဲမှာ ပဲနောက်ထပ် device တစ်ခုသုံးထားသလားဆိုတာကို စစ်ဆေးကြည့်ပါ။ ဟုတ်တယ်ဆိုရင်တော့ Device ကိုDisable ပေးလိုက်ပါ။ တကယ်လို့များ IRQ မှာ နောက်ထပ် deviceတစ်ခုသုံးထားတာကို မတွေ့ဘူးဆိုရင် Config.sys (or) Autoexex.bat မှာdrivers ကိုရှာပြီးတော့ disable ပေးလိုက်ပါ။

30.” This device is not working properly because Windows cannot load the drivers required for this device.” Properties ကို clickပါ။ ဒါကိုတောင် click လို့မရဘူးဆိုရင်တော့ Remove\Add လုပ်ပါပြန်စမ်းကြည့်လိုက်ပါဦး။ ဒါမှ အဆင်မပြေသေးဘူး ဆိုရင်တော့ Update သာလုပ်လိုက်ပါတော့။

31.” Windows cannot install the drivers for this device because itcannot access the drive or network location that has the setup files on it.” Restart ချ လိုက်ပါ။

32.”Windows cannot determine which resources are required for this device.” Troubleshooting wizard နဲ့ကြိုးစားကြည့်လိုက်ပါ။ အဆင်မပြေသေးဘူးဆိုရင်တော့ Device change ရတော့မှာပါ။

33.” Windows cannot determine the settings for this device. Consult thedocumentation that came with this device and use the Resource tab toset the configuration.” Hardware settings ကို change လိုက်ပါ။ ပြီးရင် Resources tab ကိုသွားပြီးConfigure လုပ်လိုက်ပါ။

34.” Your computer's system firmware does not include enoughinformation to configure and use this device properly. To use thisdevice, contact your computer manufacturer to obtain a firmware or BIOS update.” Troubleshooting wizard နဲ့ကြိုးစားကြည့်လိုက်ပါ။ အဆင်မပြေဘူးဆိုရင်တော့ BIOS ကို update ဒါမှမဟုတ် BIOS အသစ်လဲရပါတော့မယ်။

35.” This device is requesting a PCI interrupt but is configured for anISA interrupt (or vice versa). Please use the computer's system setupprogram to reconfigure the interrupt for this device.” သင့်ရဲ့ BIOS မှာ IRQ settings ကိုဘယ်လိုပြန်လည်စီစဉ် ထားသလဲဆိုတာစစ်ဆေးကြည့်ပါ။ ပြီးရင် Troubleshoot !!!

36.”Windows cannot initialize the device driver for this hardware.” Computer ကို restart အရင်ပေးလိုက်ပါ။ ပြီးရင်တော့ Troubleshoot!!

37.” Windows cannot load the device driver for this hardware because aprevious instance of the device driver is still in memory.” Driver ကို Uninstall လုပ်ပြီးရင် Reinstall ,Trobleshooting!!!!!!!!

38.” Windows cannot access this hardware because its service keyinformation in the registry is missing or recorded incorrectly.” အမှတ်စဉ် 37 အတိုင်းလုပ်ဆောင်ရပါမယ်။

39.” Windows successfully loaded the device driver for this hardware but cannot find the hardware device.”Driver ကို Uninstall, Reinstall လုပ်လိုက်ပါ။ ပြီးရင် Troubleshoot!!! တကယ်လို့ device က non-plug-and-play ဖြစ်နေမယ်ဆိုရင် အောက်ပါအတိုင်းလုပ်ဆောင် ပေးရပါဦးမယ်။ Control Panel\Performance and Maintenance\System\Hardware\Add Hardware Wizard

40.” Windows cannot load the device driver for this hardware because there is a duplicate device already running in the system.” Restart ပေးလိုက်ပါ, window ပြန်တက်လာတာနဲ့ Device Manager\General tab\Troubleshoot!!!!!!

41.” Windows has stopped this device because it has reported problems.”Hardware documentation ကို စစ်ဆေးကြည့်ပါ။ ပြီးရင် Troubleshoot!!!!

42.” An application or service has shut down this hardware device.” Restart လုပ်ပါ။ ပြီးရင် Troubleshoot!!!!!!!!

43.” Windows cannot gain access to this hardware device because the operating system is in the process of shutting down.” ဘာမှ ပြုပြင်ပြောင်းလဲ စရာမလိုအပ်ပါဘူး။ computer ကို ဖွင့်လိုက်တာနဲ့ ပုံမှန်အလုပ် လုပ်သွားမှာပါ။

44.” Windows cannot use this hardware device because it has beenprepared for "safe removal" but it has not been removed from thecomputer.” Device ကို ဖြုတ်ပြီး ပြန်တပ်လိုက်ပါ။

45.” The software for this device has been blocked from startingbecause it is known to have problems with Windows. Contact the hardwarevendor for a new driver.” Driver update (or) New လိုအပ်နေပါတယ်။


Credit & Ref: http://www.mawcity.com

                 : လေလွင့်သူလေး

Ebooks ကို အောက်တွင် Download လုပ်နိုင်ပါတယ်။



Ebooks လိုလျှင် click နှိပ်ပါ။


နည်းပညာဗဟုသုတပြည့်ဝကြပါစေ
Rate this posting:
{[['']]}

Saturday, February 15, 2014

POWER_SUPPLYများအကြောင်းသိကောင်းစရာ

POWER_SUPPLYများအကြောင်းသိကောင်းစရာebook လေးပါ။ ဤစာအုပ်ရေးသားသူအား အထူး လေးစားပါသည်။ မိမိသိသော အသိပညာအား ပြန်လည်မျှဝေပေးသဖြင့် ကျေးဇူးလဲတင်ပါသည်။ မိုးလဲ တဆင့်ပြန်လည်မျှဝေလိုပါသဖြင့် credit ပေးပါသည်။


နည်းပညာမောင်နှမများအား ထာဝရလေးစားလျှက်


Rate this posting:
{[['']]}

HARD_DISKများအကြောင်းသိကောင်းစရာ


HARD_DISKများအကြောင်းသိကောင်းစရာ ebook လေးပါ။ ဤစာအုပ်ရေးသားသူအား အထူး လေးစားပါသည်။ မိမိသိသော အသိပညာအား ပြန်လည်မျှဝေပေးသဖြင့် ကျေးဇူးလဲတင်ပါသည်။ မိုးလဲ တဆင့်ပြန်လည်မျှဝေလိုပါသဖြင့် credit ပေးပါသည်။


နည်းပညာမောင်နှမများအား ထာဝရလေးစားလျက်

Rate this posting:
{[['']]}

MOTHERBOARDများအကြောင်းသိကောင်းစရာ

Computer Hardware သမားများအတွက် ရည်ရွယ်ပြီး MOTHERBOARDများအကြောင်းသိကောင်းစရာ စာအုပ်အား တင်ပေးလိုက်ပါတယ်။ ဤစာအုပ်ရေးသားသူအား အထူးလေးစားပါတယ်။ မိမိတတ်သော အသိပညာအား ပြန်လည်မျှဝေသည့်အတွက် ကျေးဇူးတင်ပါတယ်ရှင်။ ပြန်လည်မျှဝေခွင့်ပြုပါရှင်။ 


Rate this posting:
{[['']]}

Core i3 ,Core i5 and Core i7 ကွာခြားချက်များ


 Core i3 ,Core i5 and Core i7 ကွာခြားချက်များအကြောင်း ebook လေးပါ။  ဤစာအုပ်ရေးသားသူအား အထူး လေးစားပါသည်။ မိမိသိသော အသိပညာအား ပြန်လည်မျှဝေပေးသဖြင့် ကျေးဇူးလဲတင်ပါသည်။ မိုးလဲ တဆင့်ပြန်လည်မျှဝေလိုပါသဖြင့် credit ပေးပါသည်။ 


နည်းပညာမောင်နှမများအား ထာဝရလေးစားချက်


Rate this posting:
{[['']]}

Wednesday, September 25, 2013

BIOS Password ဖြေနည်း (၂)


Technician တွေ Window တင်ခါနီး အချို့စက်တွေမှာ BIOS Password ထည့်ထားရင် တိုင်ပတ်ပါပြီ။ Desktop တွေမှာ CMOS Clear လုပ်လို့ အဆင်ပြေပေမယ့် Laptop မှာ ဆို အဆင်မပြေတော့ဘူးနော်။ မမိုးတို့ Softwareလေးတခုနဲ့ ဖြည်ကြည့်ရအောင်နော်။ ဒါနဲ့ပါဆို BIOS password ဖြည်နည်း (၂)ခု ရှိပြီနော်။ Software ကို အသုံးပြုဖို့ OS raun နေတဲ့ Computer တလုံး လိုအပ်ပါတယ်ရှင်။ ပထမဆုံး Software ကို Download Link မှာ အရင် ဒေါင်းပါ။
ဒေါင်းလို့ရလာတဲ့ Rar File ကို ဖြည်ပြီး Local Disc D: ထဲမှာ သိမ်းပေးပါ။ (မှတ်ချက်-နှစ်သက်ရာနေရာတွင် သိမ်းနိုင်သည်၊ အသုံးပြုလျှင် မိမိ သိမ်းထားသော နေရာကို ပြန်ရွေးရန် မမေ့ပါနှင့်)
ပြီးလျှင်

(1) BIOS Password ဖြည်မယ့် Computer ကို ဖွင့်ပြီး BIOS ထဲသို့ F2 နှိပ်ပီးဝင်မယ်။ 
(2) Password တောင်းရင် Enter (၃)ခါလောက်နှိပ်လိုက်ရင် ပုံပါအတိုင်း ဥပမာ- System Disabled (01987) ဆိုပြီး Code လေး ပေးလာပါမယ်။ 


(3) Window Key+R တွဲနှိပ်ပြီး Run Box ကို ဖွင့် >> cmd >> D:  ကိုရိုက်ပါ။ (မှတ်ချက်- D: နေရာတွင် Software သိမ်းထားသော နေရာကို ပြန်ညွှန်းရန်)
(4) D:\ အောက်ရောက်သွားရင်   
bios_pw 01987 0 လို့ရိုက်ရပါမယ် ( 01987 နေရာတွင် System Disable မှ ပေးသော Code ကို ရိုက်ရန်)
ဥပမာ - unlock6.exe v1.0 1 1 July 1997
            5pjoitn
            xtufdqz
            98h7pgk

- အဲဒီ Key လေးတွေ ထဲက တစ်ခုခုကို ရိုက်ထည့်ကြည့်ပေါ့။


(1) D: 
(2) bios_pw 01987
(3) passwords

အဆင်ပြေကြပါစေရှင်
မိုး

Rate this posting:
{[['']]}

Tuesday, September 24, 2013

BIOS Password ရှာပေးမယ့် Website

ကဲ Technician တွေ Window တင်ခါနီး အချို့စက်တွေမှာ BIOS Password ထည့်ထားရင် တိုင်ပတ်ပါပြီ။ Desktop တွေမှာ CMOS Clear လုပ်လို့ အဆင်ပြေပေမယ့် Laptop မှာ ဆို အဆင်မပြေတော့ဘူးနော်။ ဒီနေ့ မမိုး တွေ့ခဲ့တဲ့ Website လေးတခုကို ညွှန်းချင်ပါတယ်ရှင်... 
ဘယ်လိုအသုံးပြုမလဲ...
(1) F2 နှိပ်ပီးဝင်မယ်။
(2) Password တောင်းရင် Enter (4)ခါလောက်နှိပ်လိုက်ရင် ပုံပါအတိုင်း System Disabled (              ) ဆိုပြီး Code လေး ပေးလာပါမယ်။
(4) ဒီ ကုတ်လေးကို      Click      ဒါလေးနှိပ်ပြီး Code ကိုရိုက်လိုက်မယ်ဆိုရင် Code နဲ့ ပတ်သက်တဲ့ Password တွေကို ချပေးပါ့မယ်။
အဲအထဲကမှ မိမိစက်နဲ့ကိုက်ညီတဲ့ password ကို ရွေးချယ်ပြီး Enter နှိပ်လိုက်ပါရှင်။ ဒါက အကောင်းဆုံးလို့ မရည်ညွှန်းလိုပါရှင်။ ဒီထက်ကောင်းတဲ့ offline သုံးနိုင်တာမျိုးကို ရှာတွေ့ရင် ထပ်ပြီး တင်ပေးပါ့မယ်ရှင်။


Blogger အားလုံးအား ထာဝရလေးစားလျှက် 

မိုး


Rate this posting:
{[['']]}

Monday, December 5, 2011

Computer Memory ကို Clear လုပ်နည်း

မိမိ Computer ရဲ့ Memory ကို သန့်ရှင်းရေးလုပ်နည်းလေးပါ။

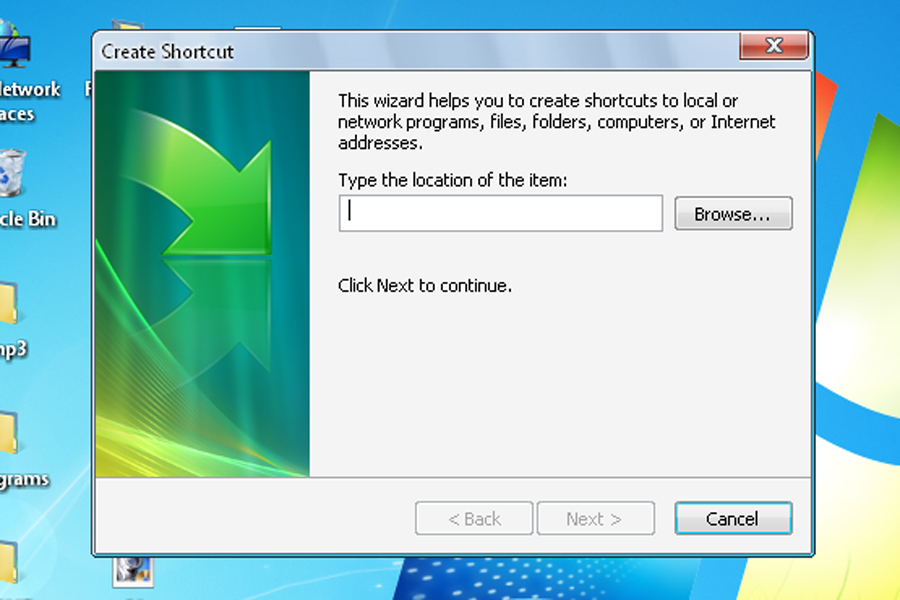
- ပုံ (၁) တွင် ပြထားသည့်အတိုင်း Desktop ပေါ်မှာ Right-click နှိပ်ပြီး New-Shortcut ကိုထပ်နိုပ်ပါ၊


               ပုံ (၁)
-Type the location of the item ပုံ (၂) တွင် အောက်တွင်ပေးထားသော စာမျာကို ရိုက်ထည့်လိုက်ပါ။
%windir%\system32\rundll32.exe advapi32.dll,ProcessIdleTasks


ပုံ (၂)
-Next ကိုနှိပ်လိုက်ပါ။

- Type a name for this shortcut တွင် Clear Memory ဟုရိုက်ပြီး Finish ကို နှိပ်လိုက်ပါ။

အားလုံးပဲ အဆင်ပြေကြပါစေလို့....

မိုး
Rate this posting:
{[['']]}

Monday, October 31, 2011

Video Graphic Adapter (VGA) အကြောင်း သိကောင်းစရာ

VGA

Output များ
ပုံမှာပြထားတာကတော့ Graphic Card ရဲ့ output တွေရှိရာနေရာပဲဖြစ်ပါတယ်။ PC ရဲ့ hardwares တွေဟာ digital နည်းပညာဖြစ်တဲ့ 0 နဲ့ 1 တွေနဲ့သာလုပ်ဆောင်ပါတယ်။ ဒါကြောင့်သူတို့ကထွက်လာတဲ့ output ဟာ digital တွေပဲဖြစ်ပါတယ်။ ဒါပေမယ့် ကျွန်တော်တို ့အရင်တုန်းကသုံးခဲ့တဲ့ CRT Monitor တွေဟာ Analog ဖြစ်ပါတယ်။ သူတို ့အတွက် digital ကနေ Analog ပြောင်းဖို့ digital to analog converter (DAC) လို့ခေါ်တဲ့ device တွေလိုလာပါတယ်။ ယခုသုံးနေတဲ့ LCD တွေကတော့ digital တွေဖြစ်ပါတယ်။ ဒါကြောင့် DAC တွေရဲ့လိုအပ်မှုဟာလည်းနည်းပါးလာပါတယ်။ ဒါပေမယ့် စံတစ်ခုအနေနဲ့analog ကိုထောက်ပံ့ပေးနေတုန်းပါပဲ။

VGA output (D-sub)
VGA output မှဆိုရင် pin အရေအတွက် 15 pins ပါပါတယ်။ သူကို သာမန်အားဖြင့် အပြာရောင်နဲ့သက်မှတ်ပါတယ်။ VGA ကတော့ Video Graphic Array ကိုဆိုလိုပါတယ်။ Hardware ပိုင်းမှာတော့ Video Graphic Adapter လို့ခေါ်ပါတယ်။ ၎င်းဟာ analog display Signal တွေကိုထောက်ပံ့ပေးပါတယ်။

DVI Output
DVI ဟာ စံသက်မှတ်ထားတဲ့ digital output ဖြစ်ပါတယ်။ DVI ရဲ့အရှည် ကတော့ Digital Visual Interface ဖြစ်ပါတယ်။ DVI ကိုများသောအားဖြင့် digital projector တွေ၊ HDTV (High Definition TeleVeision) တွေနဲ့ချိတ်ဆက်နိုင်ပါတယ်။ ၎င်းဟာ resolution အနေဖြင့် 2560x1600 ထိထောက်ပံ့နိုင်ပါတယ်။ 2004 ခုနှစ်ထက် နောက်မကျတဲ့ ကဒ်တွေမှာဆိုရင် DVI ပေါက် တစ်ပေါက်ကတော့ ပါပါတယ်။
Composite Video Output
ဒါကတော့ Composite Video Output ဖြစ်ပါတယ်။ သူ့ကို RCA (Radio Corporation of America )လို ့လည်းခေါ်ပါတယ်။ သူ့ကို TV တွေ၊ VCRလို ပစ္စည်းမျိုးတွေနဲ့ချိတ်ဆက်အသုံးပြုပါတယ်။ဒါပေမယ့် very low resolution analog signal တွေကိုပဲ ပေးပို ့နိုင်ပါတယ်။

S-Video (S-VHS)
S-Video က Super Video သို့ Super VHS လို့ခေါ်ပါတယ်။ S-Video မှာ Pin 4 ခုပါပါတယ်။ သူကိုတော့ television industry တွေက စံအဖြစ်သက်မှက်ထားပါတယ်။ သူလည်းပဲ low resolution analog signal တွေကိုပဲပေးပို ့နိုင်ပါတယ်။ ဒါပေမယ့် composite video output ထက်စာရင်ကောင်းပါတယ်။ single cable video output မှာတော့ စံအဖြစ်ရှိနေသေးပါတယ်။

Component Video
Component Video တွေဟာ Graphic Card မှာထည့်သွင်းဖို ့အတွက် များပြားနေတာကြောင့် သက်သက် adapter တစ်ခုအနေနဲ့ပဲပါဝင်ပါတယ်။ Component Video Output မှာဆိုရင် Video အတွက်သာမကပဲ audio ပါ ပါဝင်လာပါတယ်။ အစွန်ဆုံး က အစိမ်း၊ အနီနဲ့ အပြာ က video အတွက်ဖြစ်ပြီးတော့ ကျန်တဲ့ နှစ်ခုက audio အတွက်ဖြစ်ပါတယ်။ သူရဲ့ output တွေကို Y, Pb, Pr လို့ခေါ်တဲ့ output တွေအနေနဲ့ ခွဲထွက်လာတာကြောင့် HDTV တွေ၊ Digital projector တွေနဲ့ချိတ်ဆက်နိုင်ပါတယ်။
သူရဲ့ signal တွေဟာ analog တွေဖြစ်ပေမယ့်လို့ သီးခြား colour output တွေအနေနဲ့ခွဲထုက်ထားတာကြောင့် High resolution ကိုရစေပါတယ်။

HDMI
HDMI ကတော့ High Definition Multimedia Interface ကိုညွှန်းဆိုတာပဲဖြစ်ပါတယ်။ HDMI ကိုသာမန် graphic card တွေမျာမတွေ့ရပဲ၊ Entertainment ဦးစားပေး ကဒ်တွေနဲ့ High end card တွေမှာပဲတွေ့ရပါတယ်။ HDMI မှာ High definition Video နဲ့ Audio တွေကို ပေးပို ့နိုင်စွမ်းရှိပါတယ်။
ဒါပေမယ့် သူ့နဲ့ချိတ်ဆက်မယ့် cable တွေကတော့ ဈေးကြီးနေပါသေးတယ်။

Graphic Card Interfaces
ပုံမှာပြထားတာကတော့ Graphic Card Interface ဖြစ်ပါတယ်။ Graphic Card Interface ဟာ graphci card နဲ့ computer ကြား ချိတ်ဆက်ပေးတဲ့ အရာပဲဖြစ်ပါတယ်။
Graphic card တွေကိုဝယ်ယူရာမှာ Interface ကအရမ်းကိုအရေးကြီးပါတယ်။ ကိုယ့် MB ရဲ့ Graphic card slot ဟာ ကိုယ်ဝယ်လာတဲ့ Graphic Card ရဲ့ Interface ချင်းကိုက်ညီမှုမရှိဘူးဆိုရင် တပ်ဆင်လို ့မရပါဘူး။ ဥပမာ အားဖြင့် PCI Express graphic card ဟာ AGP slot မှာတပ်ဆင်လို့မရသလို AGP Graphic Card ကလည်း PCI Express slot မှာတပ်ဆင်လို့မရပါဘူး။ MB နဲ့ Graphic Card အပြန်အလှန် data ပေးပို့နိုင်မှုကို Bandwidth နဲ့တိုင်းတာပါတယ်။ Bandwidth မြင့်လေ graphic card က မြန်မြန်ဆန်ဆန် အလုပ်လုပ်နိုင်လေဖြစ်ပါတယ်။ ဒါပေမယ့်လဲ Graphic Card Industry တွေပြောသလောက် Interface တစ်ခုနဲ့တစ်ခု သိပ်ပြီးကွာခြားမှုမရှိပါဘူး။
Interface တွေဟာ အရင်တုန်းက အများကြီးရှိပေမယ့် လို ့အခုအခါမှာတော့ AGP နဲ့ PCI Express ပဲကျန်ပါတော့တယ်။ ဒါပေမယ့် ဗဟုသုတ အနေနဲ့ဖော်ပြပေးလိုက်ပါတယ်။

ISA
ISA ဆိုတာက Industry Standard Architechure ကိုဆိုလိုပါတယ်။ သူကို ဟိုးအရင်တုန်းက ကွန်ပျုတာတွေမှာပဲ တွေ့နိုင်ပါတယ်။ အခုချိန်မှာတော့ ပျောက်ကွယ်သွားပါပြီ။ သူမှာ 8 bit wide interface နဲ့ 16 bit wide interface ဆိုပြီး graphic card နှစ်မျိုးထွက်ရှိပါတယ်။ EISA (Extended ISA) ဆိုပြီးထွက်ပေါ်လာပါသေးတယ်။ သူကတော့ 32 bit wide ရှိပါတယ်။ ဒါပေမယ့် ဈေးကြီးတဲ့အတွက် နောက်ထပ် Interface အသစ်ထွက်ပေါ်လာတဲ့အခါ မှေးမှိန်သွားခဲ့တယ်။

PCI
PCI က Peripheral Components Interconnect ကိုဆိုလိုပါတယ်။ သူက 32 bit wide interface ဖြစ်ပြီး 33MHz speed နဲ့ run ပါတယ်။ 133 MB/s Bandwidth ကိုရရှိပါတယ်။ PCI ကို ISA တွေနေရာမှာ အစားထိုးအသုံးပြုပါတယ်။ PCI တွေကို add in card တွေအတွက် ယခုထိစံထားသုံးစွဲနေသေးပါတယ်။ ဒါပေမယ့် Graphic Card တွေအတွက်ကတော့ မသုံးတော့ပါဘူး။

PCI X
PCI -X ကတော့ PCI Extended ကိုဆိုလိုတာဖြစ်ပါတယ်။ သူ့မှာ 64 bit wide interface ရှိပြီး 4266 MB/s bandwidth ရှိပါတယ်။ ဒီကဒ်တွေကို server တွေမှာပဲအသုံးပြုခဲ့ပြီး တွေ့ရခဲပါတယ်။ PCI X ကဒ်တွေကို ကျွန်တော်တို ့ရဲ့ PCI ver 2.2 slot တွေမှာတပ်ဆင်နိုင်ပါတယ်။ ဒါပေမယ့် PCI Express slot တွေမှာတပ်လို ့မရပါဘူး။

AGP
AGP ကတော့ Accelerated Graphic Port ကိုဆိုလိုပါတယ်။ သူကို PCI rev 2.1 ပေါ်ကို အခြေခံပြီးထုက်လုပ်ထားတာဖြစ်ပါတယ်။ AGP မှာ system memory နဲ့ တိုက်ရိုက်ချိတ်ဆက် အလုပ်လုပ်နိုင်မှု၊ organization နဲ့ data transfer မှာ de-multiplexing နဲ့ simplification လုပ်ဆောင်နိုင်မှု၊ clock speed မြန်ဆန်မှုတို့ကြောင့် PCI တွေအပေါ်ကို အသာစီးရထားပါတယ်။AGP ကို verison ၃မျိုးနဲ့ထုက် ပါတယ်။ AGP x1, AGP 4x, AGP 8x တို့ဖြစ်ပါတယ်။ AGP ဟာ 32 bit wide နဲ့ 66MHz speed ရှိပါတယ်။ 266MB/s bandwidth ကိုရပါတယ်။ AGP 8x ဆိုတာက AGP 1x ထက် ၈ဆပိုမြန်တယ်လို ့ဆိုတာဖြစ်ပါတယ်။ AGP 8x ကို 4x slot မှာတပ်ဆင်နိုင်ပါတယ်။ ဒါပေမယ့် 4x speed နဲ့ပဲအလုပ်လုပ်မှာဖြစ်ပါတယ်။ ထို့အတူပဲ AGP 4x ကို 8x slot မှာတပ်ဆင်ပါက 4x speed နဲ့ပဲအလုပ်လုပ်မှာဖြစ်ပါတယ်။

PCI Express
PCI Express ဟာ Parallel Interface Bus system တွေဖြစ်တဲ့ ISA, PCI, AGP တွေနဲ့မတူပဲ Serial Interface Bus System ရှိပါတယ်။ Parallel Bus တွေနဲ့မတူတာက စုစုပေါင်း Bandwidth ကို device တွေအားလုံးကရနိုင်တာပါပဲ။PCI Express တွေဟာ single Links တစ်ခုခြင်းစီရဲ့ speed ကို မြှောက်ခြင်းနဲ့ အလုပ်လုပ်ပါတယ်။ single link တစ်ခုမှာ 250MB/s up stream နဲ့ 250 MB/s downstream ရှိပါတယ် (upstream to the system and downstream to the device)။ PCI E x 16 က single link ရဲ့ ၁၆ ဆ ဖြစ်တဲ့ 4GB/s up stream နဲ့ 4GB/s downstream (total 8GB/s) ရှိပါတယ်။ PCI Express x16 card တွေဟာအမြဲတမ်း 16 ဆနဲ့အလုပ်လုပ်စရာမလိုပါဘူး။ ဒါကြောင့် dual Graphic card တွေကို တပ်ဆင်နိုင်အောင် ဆောင်ရွက်လာတယ်။ PCIE x16 slots နှစ်ခုပါလာပြီး slot တစ်ခုပဲသုံးမယ်ဆိုရင် 16x နဲ့ လုပ်နိုင်ပြီး card နှစ်ခုသုံးပါက 8x နဲ့အလုပ်လုပ်ကြတယ်။ ဒါကြောင့် SLI နဲ့ Crossfire နည်းပညာကိုထောက်ပံ့တဲ့ ကဒ်တွေကို PCI Express interface နဲ့ပဲလာတာဖြစ်တယ်။ ဒါပေမယ့် Bandwidth တွေကို တိုးလာတာနဲ့အမျှ Card တွေမှာလည်း power ပိုမိုလိုအပ်လာတယ်။ Slot က power နဲ့မလုံလောက်တော့တဲ့အခါမှာ card တွေမှာ Power connector တွေသက်သက်ထည့်သွင်းလာတယ်။ယခုပေါ်ထွက်နေတဲ့ Mid-range နဲ့ highend card တွေမှာဆိုရင် 4-pin, 6-Pin, 8-pin power connector တွေ တစ်ခုကနေ နှစ်ခုထိပါဝင်လာတယ်။


Graphic Processor and Memory
ကွန်ပျုတာမှာ CPU ကို ကွန်ပျုတာရဲ့ Brain အဖြစ်တင်စားရင် Graphic Card မှာ GPU ကို အသည်းနှလုံးအဖြစ်တင်စားရလိမ့် မယ်။ သူကို Cooler အောက်မှာထားတယ်။ CPU လိုသူကို ဖြုတ်တပ်လို့မရပါဘူး။ Graphic Card ထုက်လုပ်သူတွေက တခါတည်းတပ်ဆင်ပေးလိုက်တယ်။ Pixel Shaders, Vertex Shader, Pipelines, Core clock speeds တွေဟာ GPU ကလုပ်ဆောင်ပေးနိုင်တဲ့ architecture တွေပဲဖြစ်တယ်။
Graphic card တွေကိုကြည့်ရင် GPU အပြင်နောက်တစ်ခုပါဝင်လာတာက Memory ပဲဖြစ်တယ်။ Memory တွေကို တော့ GPU နဲ့အတက်နိုင်ဆုံး နီးအောင်ထားကြတယ်။ Interface Clock speed မြင့်မြင့်ရအောင်ဖြစ်တယ်။
Graphic Memory တွေဟာ DDR2, DDR3, GDDR3, GDDR4, GDDR5 ဆိုပြီးရှိကြတယ်။ အဲ့ဒီ့ Memory တွေဟာ 64 bit wide ကနေ 512 bit wide ထိရှိတယ်။ memory များလေ graphical data ကိုပိုပြီး store လုပ်နိုင်လေဖြစ်တယ်။ Memory နည်းရင် လိုအပ်တဲ့ data က graphic memory နဲ့မလုံလောက်တဲ့အခါ system memory ကနေသွားယူနေရတယ်။ ဒါပေမယ့်လည်း Graphic memory ရဲ့ပမာဏ ကသိပ်ပြီးအဓိကမကြပါဘူး။ သူ့ရဲ့ memory bus wide ကပိုပြီးတော့အဓိကကျပါတယ်။ 512MB graphic memeory ရှိတဲ့ card နဲ့ 1GB memory ရှိတဲ့ card နှစ်ခုဟာ performance သိပ်မကွာလှပါဘူး။ ဒါပေမယ့် 64 bit bus wide နဲ့ 128 bit bus wide နှစ်ခုဆိုရင်တော့ သိသိသာသာကွာခြားပါတယ်။
Cooling Devices
GPU တွေဟာ CPU တွေလိုပဲ ကွန်ပျူတာရဲ့ အပူဆုံးအစိတ်အပိုင်း တစ်ခုဖြစ်တယ်။ သူကို အအေးမပေးဘူးဆိုရင် လောင်ကျွမ်းသွားနိုင်တယ်။ ဒါကြောင့် သူမှာ Cooling Device တွေပါဝင်လာရတယ်။
Cooling Device တွေကို passive Cooling , Active Cooling, နဲ့ water cooling ဆိုပြီးရှိတယ်။
Passive Cooling မှာဆိုရင် အပူကို Cooling Device ကနေသူဘာသာသူ စွန့်ထုက်တယ်။ ဥပမာအားဖြင့် heatsink တွေဖြစ်တယ်။
Active cooling ကတော့ GPU ကအပူကို cooling device ဆီကို heatpipe လိုဟာမျိုးနဲ့ ကူးပြောင်းစေပြီးမှ စွန်ု့ထုက်တယ်။ heat sink ကနေစွန့်ထုက်တဲ့ ပမာဏနဲ့မလောက်တော့တဲ့အခါမှာ သုံးပါတယ် ဥပမာကို ပုံမှာပြထားပါတယ်။ High End card အများစုဟာ Active cooling တွေဖြစ်တယ်။
Water Cooling ကတော့ တိက်ဆိတ်ညိမ်သက်တဲ့ cooling ကိုလိုချင်သူတွေနဲ့ Overclocker တွေအတွက်ဖြစ်တယ်။ ၎င်းအမျိုးအစားတွေဟာ ဈေးနှုန်းကြီးမားပါတယ်။
GPU ကနေအပူထုက်မှုများလာတာနဲ့ သေးငယ်တဲ့ cooling device တွေကမလုံလောက်တော့ပါဘူး။ ဒီ့အတွက်ပိုမိုကြီးမားတဲ့ cooler တွေလိုအပ်လာတယ်။
Cooler အပိုင်းမှာ single slot cooler နဲ့ dual slot cooler ဆိုပြီးရှိတယ်။
Single slot cooler ဟာ သူ့ရဲ့ တပ်ဆင်တဲ့ slot နေရာတစ်ခုထဲနဲ့တင်လုံလောက်ပါတယ်။ သူဘေးမှာရှိတဲ့ card တွေအတွက်လည်းအဆင်ပြေစေပါတယ်။
Single slot cooler နဲ့မလုံလောက်တဲ့အခါ dual slot cooler ကိုတပ်ဆင်ပေးလာတယ်။ သူက slot နှစ်ခုစာနေရာယူတယ်။ ဒါပေမယ့် Dual Slot cooler တွေလေပူတွေကို case ရဲ့အနောက်ဘက်ကို သူရဲ့ backplate ကနေပြီးထုက်ပေးတဲ့အတွက် casing အတွင်းဖြစ်ပေါ်တဲ့အပူကိုလျှော့ချပေးနိုင်တယ်။

Triple Slot Cooler ဆိုတာရှိပါသေးတယ်။ သူတို့ High End Cooling အတွက်ပဲသုံးပါတယ်။

Vertex
3D game ထဲက object တစ်ခုဒါမှာမဟုတ် 3D model တစ်ခု ကို vertices တွေနဲ့ပြုလုပ်ထားပါတယ်။ Vertex ဆိုတာကတော့ X,Y,Z coordinates ရှိတဲ့ အစက်ကလေးတွေပဲဖြစ်ပါတယ်။ မျဉ်းဖြောင့်တစ်ကြောင်းရဖို ့ vertex အနည်းဆုံးနှစ်ခုလိုပါတယ်။ မျက်နာပြင်တစ်ခုဖြစ်ဆို ့ vertex အနည်းဆုံး သုံးခုလိုပါတယ်။ အောက်ပါပုံကိုကြည့်ပါ။ ကွန်ပျူတာလောကမှာ မျဉ်းကွေးဆိုတာမရှိပါဘူး။ ဒါကြောင့် မျဉ်းကွေးတစ်ကြောင်းရဖို ့ vertex တွေအများကြီးကို ဆက်ရတယ်။ ပိုမိုရှုပ်ထွေးတဲ့ 3D object တွေမှာဆိုရင် vertex တွေအများကြီးပါဝင်ပါတယ်။


Texture
Texture ကတော့ 3D မျက်နာပြင်တွေမှာပေါ်တဲ့ အသားရေလို ့ပြောရပါမယ်။ ပုံကိုကြည့်ပါ။ ပထမပုံက texture မထည့်ရသေးတဲ့ 3D box တစ်ခုဖြစ်ပြီး နောက်တစ်ပုံက texture ထည့်ထားတဲ့ ပုံဖြစ်ပါတယ်။ Texture တွေကြောင့်သာ ကျွန်တော်တို ့တွေ ဂိမ်းတွေထဲမှာ မြက်ခင်းစိမ်းတွေ၊ အုက်စီထားတဲ့ အိမ်နံရံတွေကိုမြင်ရတာပါပဲ။


Shader
Shader ဆိုတာဟာ ဥပမာရေပြင်ပေါ်မှာ နေရောင်ပြန်တာမျိုး ဖြစ်နေအောင်လုပ်ပေးတာကိုဆိုလိုပါတယ်။ ပုံဖေါ်ပေးတဲ့အရာလို ့ပဲဆိုပါတော့။ ယေဘုံယအားဖြင့်တော့ shader နှစ်မျိုးရှိပါတယ်။ Pixel Shader နဲ့ Vertex Shader တို့ဖြစ်ပါတယ်။ Vertex shader ကတော့ 3D object တွေကို ပုံဖော်ပေးတယ်။ Pixel Shader တွေကတော့ Pixel တွေရဲ့ အရောင်တွေကို ပြောင်းလဲပေးပါတယ်။ ဥပမာအားဖြင့်ပြောရရင် ဂိမ်းထဲမှာပါဝင်တဲ့ ဓါး တွေကိုအရောင်လက်အောင်လုပ်ပေးတာမျိုးပါ။


Fill rates
ကျွန်တောတို့တွေ Graphic Card ကြော်ငြာတွေမှာ Core clock တွေ၊ memory clock တွေအပြင် fill rate တွေကိုပါတွေ ့ရတက်ပါတယ်။ Fill rate မှာလည်း နှစ်မျိုးနှစ်စား ရှိပါတယ်။ Pixel Fill Rate နဲ့ Texture Fill Rate တို့ဖြစ်ပါတယ်။ Pixel Fill Rate က Graphic Card ကနေ တစ် second မှာ pixel ပေါင်း ဘယ်လောက်ထုက်ပေးနိုင်လဲဆိုတာဖြစ်ပါတယ်။ Texture Fill Rate ကတော့ Pixel တစ်ခုခြင်းစီအတွက် texture ပေါင်း ဘယ်လောက်ထုက်ပေးနိုင်လဲဆိုတာဖြစ်ပါတယ်။
Pixel Fill Rate က ROPs အရေအတွက်နဲ့ Clock Frequency မြှောက်ခြင်းနဲ့တူပါတယ်။ Texture fill rate ကတော့ nVidia နဲ့ ATI တို့ပေါ်မှုတည်ပါတယ်။ nVidia က pixel pipelines ကို clock frequency နဲ့မြှောက်ပြီး၊ ATI က Texture unit ကို clock frequency နဲ့မြှောက်ပါတယ်။


Graphic Processors
Graphic Processors တွေကတော့ nVidia နဲ့ ATI တို့မှာတစ်ခုနဲ့တစ်ခု မတူညီပါဘူး။ Nvidia က shader processor လို ့သုံးပြီးတော့ ATI က Stream processor လို ့သုံးပါတယ်။ သူတို့နှစ်ခုကို တိုက်ရိုက်နှိုင်းယှဉ်လို ့မရပါဘူး။ ဥပမာ အားဖြင့်ဆိုရင် Shader processor 128 ခုပါဝင်တဲ့ 8800 GTS က Stream processor 400 ပါဝင်တဲ့ R3870 ထက်သာပါတယ်။
သူတို့ထက်ပိုပြီးအရေးပါတဲ့အရာတွေရှိသေးပါတယ်။


Vertex Processors (Vertex Shader Unit)
Vertex Processors တွေကတော့ vertex တွေကိုဆောင်ရွက်ပေးတဲ့အရာဖြင့်တဲ့အတွက် ရှုပ်ထွေးတဲ့ 3D object တွေအများကြီးပါဝင်တဲ့ scenes တွေအတွက်အရေးကြီးပါတယ်။ ဒါပေမယ့် overall performance အတွက် တော့ pixel shader တွေလောက်အရေးမကြီးပါဘူး။


Pixel Processors (Pixel Shader Units)
Pixel shader တွေဟာ pixel တွေကိုတွက်ချက်ရာမှာအသုံးပြုပါတယ်။ Pixel တွေဟာ အရောင်တစ်ခုကို ကိုယ်စားပြုတာကြောင့် Pixel shader တွေက အံ့ဩဖွယ်ကောင်းတဲ့ graphic effect တွေကိုပြုလုပ်ရာမှာ အရေးပါပါတယ်။ ဥပမာအားဖြင့် အစစ်အမှန်နီးပါးထင်မှတ်မှားရတဲ့ ရေပြင်ကို pixel shader တွေကပြုလုပ်ပေးပါတယ်။

Unifined Shader
Unified shader တွေကိုတော့ DirectX 10 ရဲ့ unified shader architecture အတွက်အသုံးပြုပါတယ်။ ဒါကြောင့် နောက်ပိုင်း directX 10 ကိုထောက်ပံ့ပေးတဲ့ graphic card တွေမှာ shader processor တွေက unified shader တွေဖြစ်လာရတယ်။

Texture Mapping Units (TMUs)
အမှန်တကယ်တော့ texture တွေကို သူနေရာမှာသူ ရှိဖို ့ရာအတွက် address တွေလိုပါတယ်။ ဥပမာအားဖြင့် ဂိမ်းတွေမှာ အိမ်ရဲ့ ခေါင်မိုးက texture တစ်မျိုး၊ နံရံက texture တစ်မျိုး၊ တံခါးက texture တစ်မျိုး စသည်ဖြင့်ဖြစ်ပါတယ်။ ဒါတွေအတွက် TMUs တွေကလုပ်ဆောင်ပေးပါတယ်။ TMUs တွေက vertex shader နဲ့ pixel shader တွေနဲ့အတူတွဲပြီးအလုပ်လုပ်ပါတယ်။

Raster Operator Units (ROPs)
ROPs တွေက pixel တွေကို graphic memory ပေါ်ကိုရေးသားရာမှာအသုံးပြုပါတယ်။ အဲ့ဒီ့ရေးသားတဲ့ speed ကို fill rate လို့ခေါ်ပါတယ်။အရင်တုန်းက ROPs တွေရဲ့လုပ်ဆောင်ချက်က အရေးကြီးပေမယ့် အခုအခါမှာတော့ performance အပေါ်မှာတော့ သိပ်ပြီးသက်ရောက်မှုမရှိပါဘူး။


Pipelines
Pipelines လို့ပြောရာမှာ ၎င်းကို unit တစ်ခုအနေနဲ့မမှက်ယူသင့်ပါဘူး။ ဘာကြောင့်လဲဆိုတော့ graphic processor ထဲမှာ မတူညီတဲ့ pipelines တွေပါဝင်ပြီး မတူညီတဲ့ အလုပ်တွေကို လုပ်ဆောင်လို ့ပါပဲ။ ဒီမှာတော့ pipeline တွေကို pixel shader တွေနဲ့ TMUs တွေချိတ်ဆက်အလုပ်လုပ်မှုကိုဖော်ပြပါတယ်။
ဥပမာ Radeon 9700 မှာ pixel shader ၈ခု ကို TMUs ၈ခုနဲ့ချိတ်ဆက်ထားတဲ့အတွက်ကြောင့် pipelines ၈ခု ပါဝင်တယ်လို ့ပြောနိုင်ပါတယ်။ ဒါပေမယ့် အခုနောက်ပေါ် card တွေမှာတော့ ဒီလိုပြောလို့မရတော့ပါဘူး။ ဥပမာ အားဖြင့် ATI's Radeon X1600 မှာ ဆိုရင် pixel shader ၁၂ ခု ပါဝင်ပေမယ့် TMUs ကတော့ ၈ခုပဲပါဝင်ပါတယ်။ သူ့ကို pipeline ၁၂ ခုလို့မပြောနိုင်သလို ၈ခုလို့လဲမပြောနိုင်ပါဘူး။ ဘာပဲဖြစ်ဖြစ် pipeline ပိုများတဲ့ကဒ်က pipeline နည်းတဲ့ကဒ်ထက် တော့ပိုမြန်ပါတယ်။


Microsoft's DirectX, OpenGL, Shader Model
ဒီ အသုံးအနှုန်းတွေကို ကျွန်တော်တို့တွေ တွေ ့နေကြဖြစ်ပေမယ့် နားလည်သူနည်းပါတယ်။DirectX နဲ့ OpenGL တို ့က graphic API တွေဖြစ်ပါတယ်။ API ဆိုတာက Application Programming Interface ကိုဆိုလိုတာပါ။ API တွေပေါ်မလာခင်တုန်းက graphic card company တွေဟာသူတို့ ရဲ့ကဒ်တွေကို သီးသန့် programmin language တွေနဲ့အသုံးပြုနိုင်တယ်။ ဆိုလိုတာက game ရေးသားသူတွေဟာ ကဒ်အမျိုးအစားတစ်ခုစီအတွက် အကုန်ရေးသားပေးရတယ်။ ဒါမှ သူတို့ရေးတဲ့ game ကို ကဒ်တွေအကုန်လုံးနဲ့ လိုက်ဖက်ညီညီ ဆော့ကစားနိုင်မှာဖြစ်တယ်။ အဓိကပြဿနာက အချိန်ကုန်ပြီးကုန်ကျစရိတ်များတာပဲဖြစ်တယ်။ ဒီ့အတွက် programming “စံ” တစ်ခုကိုသက်မှတ်ကြတယ်။ ၎င်းကို API တွေလို့ခေါ်တယ်။ graphic အတွက်မို့လို့ graphic API လို့ခေါ်ပါတယ်။ ယခုလက်ရှိသုံးနေတဲ့ APIs တွေက DirectX နဲ့ OpenGL ပဲဖြစ်တယ်။ DirectX က Graphic card တွေပေါ်မှာ ပိုပြီး လွှမ်းမိုးမှုရှိတယ်။ တကယ်တော့ Direct X ဟာ Graphic API တစ်ခုတည်းမဟုတ်ပါဘူး။ သူ့မှာ တခြား API တွေပါဝင်ပါသေးတယ်။ ဥပမာ sound, Input device, Music စတာတွေပေါ့။ ယခုလက်ရှိမှာတော့ Direct X 11 ကအမြင့်ဆုံးပါပဲ။ Direct X version တွေက တစ်ခုနဲ့တစ်ခုမတူပါဘူး။ ဆိုလိုတာက Direct X 9.0 ကို ထောက်ပံ့ပေးတဲ့ကဒ်က direct X 10.0 ကိုမထောက်ပံ့ပေးနိုင်ပါဘူး။ ဒါပေမယ့် Direct X 10.0 ကဒ်က 9.0 ကိုတော့ထောက်ပံ့ပေးပါတယ်။ တစ်ခုသတိထားရမှာက direct X 9.0 version တွေထိပဲ window XP က လက်ခံဆောင်ရွက်နိုင်တယ်။ window vista ကြမှ 10.0 ကိုလက်ခံနိုင်ပါတယ်။ နောက်တစ်ခုက Shader Model တွေပဲဖြစ်တယ်။ သူတို့က Direct X ရဲ့ function အခွဲလေးတွေလို့ဆိုရမှာပဲ။ ဘာပဲဖြစ်ဖြစ် မြင့်လေကောင်းလေပါပဲ။ Direct X model မြှင့်ခြင်းက ပိုမိုရှုပ်ထွေးတဲ့ 3D model တွေကိုလက်ခံဆောင်ရွက်နိုင်ပါတယ်။


HDR and OpenEXR HDR
HDR (High Dynamic Range) ဆိုတာကတော့ 3D application နဲ့ game တွေမှာ အစစ်အမှန်နီးပါး အလင်းကိုရရှိဖို့အတွက် အသုံးပြုကြတယ်။ Graphic Card အကုန်လုံးဟာ Direct X version တွေလိုပဲ HDR ကိုမထောက်ပံပေးနိုင်ပါဘူး။ Direct X 9.0 ပေါ်မလာခင်တုန်းက graphic ကဒ်တွေဟာ lighting ပိုင်းအတွက် 8-Bit (256 color) ထိပဲတွက်ချက်နိုင်တယ်။ Direct X 9.0 ကဒ်တွေကတော့ lighting ပိုင်းအတွက် 24 bit (16.7 million color) ထိတွက်ချက်နိုင်လာတယ်။ Shader Model 3.0 (SM 3) ကိုထောက်ပံ့ပေးနိုင်တဲ့ ကဒ်တွေကတော့ OpenEXR HDR ကိုအသုံးပြုနိုင်တယ်။ သူက 32 bit ထိတွက်ချက်ပေးနိုင်တယ်။ OpenEXR HDR ကိုတော့အဓိကအားဖြင့် ရုပ်ရှင်လုပ်ငန်း ဖြစ်တဲ့ VFX တွေအတွက်အဓိကထားပါတယ်။ အဓိကပြဿနာကတော့ ဂိမ်းတွေကို HDR နဲ့ဆော့ရင် system တစ်ခုလုံးကို နှေးကွေးသွားတာပဲ။ ဒါကြောင့် game တွေကို HDR နဲ့ဆော့ကစားချင်ရင် graphic card အမြင့်စားတွေကိုလိုပါမယ်။


Anti-Aliasing
Aliasing ဆိုတာကတော့ အထစ်ထစ်နဲ့အနားစွန်းတွေဖြစ်နေတာ၊ အတုံးလေးတွေဖြစ်နေတာကိုဆိုလိုတာပါ။ ဒါဟာ pixel တွေကြောင့်ပါ။ ကွန်ပျူတာမှာ မျဉ်းကွေးဆိုတာမရှိပါဘူး။ မျဉ်းကွေးကိုလိုချင်ရင် pixel လေးတွေကို ဆက်ပြီးလုပ်ယူရတာကြောင့် အထစ်ထစ်တွေဖြစ်ရတာပါ။ သူကို ချေဖြက်ဖို့အတွက် Anti - Aliasing (AA) ကိုအသုံးပြုလာကြတယ်။ အဓိက color တစ်ခုကို သူ့ဘေးမှာ အရောင်အနုအရင့်ပေါင်းထည့် လိုက်ပြီးပိုမိုချောမွေ့တဲ့ မျက်နာပြင်ရအောင်ပြုလုပ်တာဖြစ်ပါတယ်။ သူရဲ့ပမာဏကို “အဆ” နဲ့ တိုင်းပါတယ်။ 2x, 4x စသည်ဖြင့်ပေါ့။ 2x AA ထက် 4x AA ကပိုပြီးချောမွေ ့ပေမယ့်လို ပိုပြီး တော့လည်း graphic power ကိုသုံးပါတယ်။ graphic performance ကိုနှေးစေတဲ့ထဲမှာ ဒီကောင်ကလည်း အဓိက ပြဿနာပါပဲ။


Texture Filtering
3D game တွေအားလုံးမှာ texture တွေပါဝင်ပါတယ်။ ဒီ texture တွေဟာ ဥပမာအားဖြင့်- texture ရှိတဲ့ မျက်နာပြင်ကို အပေါ်စီးကကြည့်ရင် ပြတ်ပြတ်သားသားမြင်ရပေမယ့် ဘေးတိုက်ကဖြစ်စေ၊ တစ်ပြေးညီကဖြစ်စေကြည့်လိုက်ရင် မှုန်ဝါးသွားတာ၊ ရှင်းရှင်းလင်းလင်းမမြင်ရတာတွေ ဖြစ်လာပါတယ်။ ဒီပြဿနာတွေကို ဖြေရှင်းဖို့အတွက် Texture Filtering ကို ထည့်သွင်းလာကြပါတယ်။ သူ့မှာ bilinear, Tri- linear နဲ့ Anistropic Filtering ဆိုပြီးရှိပါတယ်။ ဒါတွေက filtering method တွေဖြစ်ပါတယ်။ bi-linear ထက် Tri-linear ကပိုကောင်းပြီး သူတို့တွေထက် Anistropic ကပိုကောင်းပါတယ်။ ဒီ effect တွေက နောက်ပိုင်းထွက်ရှိလာတဲ့ကဒ်တွေရဲ့ performace ကိုသိသိသာသာ ထိခိုက်ခြင်းမရှိတော့ပါဘူး။ ဒါပေမယ့် texturing filtering ကိုပိုမိုသုံးရင် performance ပိုမိုလိုတယ်ဆိုတာတော့သိထားရပါမယ်။


High definition texture
Game တွေကို အပြင်လောကနဲ့တူအောင် လုပ်ဆောင်တဲ့နေရာမှာ texture တွေကလည်းအရေးပါပါတယ်။ resolution ပိုမိုကောင်းမွန်တဲ့ texture တွေကိုသုံးလေ garaphic memory များများလိုလေဖြစ်ပါတယ်။ Texture တွေကို memory တွေကအမှီမလိုက်နိုင်တဲ့အခါ game ကစားရာမှာ texture တွေကနောက်ကျ ပြီးမှ ပေါ်လာတာမျိုးတွေဖြစ်တက်ပါတယ်။ ဘာလို့လဲဆိုတော့ လိုအပ်တဲ့ texture တွေကို system memory, HDD တွေကနေခေါ်ယူနေရလို့ဖြစ်ပါတယ်။ game တွေကို texture မြင့်မြင့်နဲ့ဆော့ခြင်ရင်တော့ memory များများပါတဲ့ ကဒ်ကိုထည့်တွက်ရပါမယ်။


Choosing Graphic Card
ဒီလောက်ဆိုရင် စာဖက်သူတို့လည်း graphic card အကြောင်းကို တော်တော်များများ နားလည်လောက်ပြီထင်ပါတယ်။ ဒါဆိုရင် အခု Graphic Card တွေကိုရွေးချယ်ရာမှာ ဦးစားပေး စဉ်းစားရမယ့်အချက်တွေကိုပြောပြပါမယ်။
အခုလက်ရှိဈေးကွက်ထဲမှာ ရောက်နေတဲ့ ကဒ်အားလုံးနီးပါးဟာ PCI E တွေဖြစ်လို့ ဒါကိုတော့ ထည့်မပြောတော့ဘူး။

၁- GPU
စစခြင်း GPU ကိုစဉ်းစားရပါမယ်။ သူက Graphic performance တစ်ခုလုံးအတွက် အခရာ ကျတယ်။ သူမှာ shader processor, stream processor ဘယ်လောက်ပါသလဲ။ Pipeline တွေ၊ pixel shader တွေ၊ vertex shader တွေ၊ texture /pixel fill rate စတာတွေကိုကြည့်ရပါမယ်။

၂- Memory Interface
Graphic Memory ပမာဏထက် သူရဲ့ interface ကိုအဓိကထားရပါမယ်။ ဥပမာ- 1GB- 128bit ထက် 521MB 256 bit ကိုရွေးသင့်ပါတယ်။

၃- supporting function and output
နောက်တစ်ခုက ဘာတွေကို support လုပ်သလဲ၊ Direct X 10ရသလား၊ SM ကကော 3.0 ရရဲ့လား၊ OpenGL က ဘယ်ထိရသလဲစသည်ဖြင့်ပေါ့။ နောက်ပြီး DVI ဘယ်နှပေါက်ပါလဲ၊ HDMI ကောရရဲ့လား၊ Display Port စတာတွေကို စဉ်းစားရပါမယ်။ များသော အားဖြင့်တော့ DVI နှစ်ပေါက်၊ ဒါမှမဟုတ် DVI တစ်ပေါက်နဲ့ D-sub တစ်ပေါက်တော့ပါပါတယ်။

၄- Graphic Memory
Graphic Memory များခြင်းက graphical data တွေကို များများ လက်ခံဆောင်ရွက်နိုင်တယ်။ system ပေါ်လည်းဝန်နည်းစေပါတယ်။

၅- Monitor Resolution
Graphic card ရဲ့ performace ဟာမိမိ monitor ရဲ့ အမြင့်ဆုံး resolution မှာ ကောင်းကောင်း run နိုင်ရမယ်။ ကိုယ်ဝယ်မယ့် ကဒ်ရဲ့ performance တွေကို review site တွေမှာကြည့်ရှု့ထားသင့်တယ်။

၆- Power consumption
ကဒ်ရဲ့ လိုအပ်တဲ့ power ကို မိမိရဲ့ PSU ကထောက်ပံ့ပေးနိုင်ရဲ့လားဆိုတာ သိထားရမယ်။

၇- Multicard
ကိုယ်မှာ SLI/Crossfire တပ်ဆင်နိုင်တဲ့ MB ရှိရင် ကိုယ်ဝယ်မဲ့ ကဒ်က ၎င်းကိုထောက်ပံ့ပေးနိုင်ရမယ်။ ဒါမှ ကိုယ်က upgrade လုပ်ချင်တဲ့အခါအဆင်ပြေမယ်။

၈- Cooling
ကဒ်ရဲ့ cooling ကလည်းအရေးပါပါတယ်။ Game ဆော့နေတုန်း cooling ဂန့်သွားလို့ လောင်သွားတဲ့ကဒ်တွေကိုတွေ့ဖူးတယ်။

၉- Components
ကဒ်မှာသုံးတဲ့ပစ္စည်းတွေက Solid Capacitor တွေလား၊ militray component တွေလား ဆိုတာတွေကိုကြည့်ရမယ်။ ဒါတွေက ကဒ်ကိုကြာရှည်ခံစေပါတယ်။ အထူးသဖြင့် နောက်ထက်ကဒ်အသစ်ကိုဝယ်ယူဖို့အစီအစဉ်မရှိတဲ့သူတွေပေါ့။

၁၀-Overclocking
Overclocker များအတွက်ကတော့ဒါကအရေးကြီးတယ်။ သာမန်သုံးသူတွေကတော့ မလိုပါဘူး။ Voltage Control function ပါရဲ့လား၊ hardware overclocking ပါရဲ့လားဆိုတာကိုကြည့်ရမယ်။ Overclocking လုပ်ရင် stable ဖြစ်အောင် အပို Chipset တွေထည့်သွင်းခြင်းရှိမရှိဆိုတာကိုလည်း ကြည့်ရပါမယ်။

ဒီပို့စ်လေးကတော့ မိုးလေ့လာရင်းတွေ့ခဲ့တဲ့ ပို့စ်လေးပါ။ ဗဟုသုတအဖြစ် သူငယ်ချင်းတို့ကို မျှဝေပေးလိုက်တာပါနော်။

Read More articles on www.freemanhardwares.webs.com
Rate this posting:
{[['']]}

Monday, October 17, 2011

Defragmentation

Defragmentation ဆိုတာက Harddisk မှာရှိတဲ့ File များကို အစီအစဉ်ကျအောင်ပြုလုပ်ခြင်းပါ။
Defragmentation မလုပ်မီ မိမိ Harddisk ထဲရှိ မလိုအပ်သော File များကို အရင် ဖျက်ပါ။
မလိုအပ်သော Software များကိုလဲ Add or Remove မှဖြုတ်ပစ်ပါ။
စက်တစ်ခုလုံးရှင်းပြီးလျှင် Disk Clean Up ကိုပြုလုပ်ပေးပါ။
အားလုံးပြီးပြီဆိုရင်တော့ အောက်ပါအတိုင်း Disk Clean Up ကို ပြုလုပ်ပေးပါ။


ပြုလုပ်ပုံ
Start >> Programs >> Accessories >> System Tools >> Disk Defragmenter ကိုအဆင့်ဆင့် သွားပါ။

အကျိုးရှိပုံ - Harddisk ကို ပိုမိုမြန်စေသည်။

မှတ်ချက် - (1)လ တစ်ကြိမ်သာ ပြုလုပ်သင့်သည်။


အဆင်ပြေပါစေလို့...
မိုး


Rate this posting:
{[['']]}

Thursday, September 29, 2011

Troubleshooting for CPU


- CPU (Central Processing Unit) သည် ပုံမှန်အားဖြင့် ပျက်ခဲသော hardware တစ်ခုဖြစ်သည်။ အများ အားဖြင့် CPU ပေါ်တွင်တပ်ဆင်ထားသော ပန်ကာပျက်မှသာ အပူကြောင့် ပျက်စီးခြင်းသာ အဖြစ်များသည်။ အပူကြောင့် ဖြစ်ပေါ်လေ့ရှိသော လက္ခဏာများမှာ Computer Power စဖွင့်သောအခါ ပုံမှန်အတိုင်း လုပ်ဆောင်ခြင်း မရှိတော့တာမျိုးကို တွေ့ရလိမ့်မည်။ နောက်ဆုံးတွင် မည်သည့်လှုပ်ရှားမှုမှ မရှိတော့ဘဲ ကွန်ပျူတာ၏ လုပ်ဆောင်မှု အားလုံး (Hung) ရပ်ဆိုင်းသွားပါလိမ့်မည်။
- ထိုကဲ့သို့ (hung) သွားလျှင် CPU ပေါ်ရှိ Heat Sink နှင့် Fan တို့ကို အနေအထားမှန်ကန်စွာ တပ်ဆင်ထားခြင်း ရှိ/မရှိ စစ်ဆေးပါ။ အနေအထားမှန်ကန်လျှင် Fan ကို Power ပိတ်ထားပြီး လက်ဖြင့် လှည့်ကြည့်ပါ။ ပန်ကာရွက်သည် သွက်သွက်လည်သင့်သည်။ မသေချာသေးပါက အဖုံးဖွင့်ထားလျှက်ပင် power ဖွင့်ပြီး CPU Fan လည်/မလည် ဆူညံသံများထွက်ခြင်း ရှိ/မရှိ သတိထားစောင့်ကြည့်ပါ။
(မှတ်ချက်။ power ကို အကြာကြီးဖွင့်မထားသင့်ပါ)
-ပန်ကာလည်ပတ်နှုန်းကျနေမယ်၊ ဆူညံသံလဲထွက်နေမယ်ဆိုလျှင် Computer ကို ချက်ချင်းပိတ်ပြီး CPU Fan ကို အသစ်လဲလှယ်သင့်သည်။ လဲပြီးလျှင် Computer Power ပြန်ဖွင့်ပြီး ဘာမှမသုံးဘဲ ၂နာရီလောက် ဖွင့်ထားပေးပါ။ ပြီးနောက် Program များကိုစမ်းသုံးကြည့်ပါ။ ပုံမှန်အတိုင်း အလုပ်လုပ်ပြီဆိုလျှင် CPU ချွတ်ယွင်းချက် မရှိတာ သေချာသွားပါပြီ။
- အကယ်၍များ နဂိုပြဿနာများဆက်ဖြစ်နေလျှင် CPU ၏ ချွတ်ယွင်းချက်သာဖြစ်၍ CPU အကောင်းတစ်ခုဖြင့် လဲလှယ် စမ်းသပ်ကြည့်ပါ။ Computer သည် ပုံမှန်အတိုင်း အလုပ်လုပ်လျှင် CPU ပျက်တာ သေချာပြီပေါ့။

မိုး
Rate this posting:
{[['']]}

Twitter Facebook More